Back to All Posts

DIY Projects That We Love

Floral Images

One of the best things about the holidays is getting together with family and friends over some festive snacks and wholesome activities. Coloring is obviously our favorite go-to activity, but sometimes we like to show our crafty side and create more tangible items for gifts or around-the-house decorations. Here are some of our recent favorites that we’re creating this year:

Hanging Triangle Wreath
Items needed: twigs, tape ’n’ twine.

Traditional wreaths take a lot of time, material and patience. However, these triangular wreaths are incredibly easy to make and have a beautifully minimalist style. The best part is getting the family together for a walk in the woods to go and gather supplies. Each person can collect twigs, lichen, berries, ivy, flowers or even run to the store to pick up some eucalyptus; we don’t think store-bought is cheating.

a_001
Once home, assemble the branches and adornments into symmetrical bars. Oftentimes less is more here, so try to be conservative with your designs — it’s always easier to add a little bit more than to unravel pieces and take things away. Once you’re happy with the way it looks, wrap small amounts of washi tape (also called ‘flower tape’) around the center and edges of the wreath.

a5
Once the base is created, cut a piece around 2 feet of burlap or jute twine. Find the center point and tie the twine around the base — approximately 2 inches from the edges. This will vary greatly depending on your own base construction, but just try to create balance between the center point of the twine and the edges of the wreath. Once you’re done, hang up on a door or the mantle, pour some eggnog and listen to someone rant about the good ol’ days!

a4
Glitter Ornament
Items needed: clear glass ornaments, glitter, NON-TOXIC hardwood floor cleaner

11
This craft is incredibly easy. Take the top clip off of the glass ornament and fill up about 1/3rd of the ornament with floor cleaner.

12
Hold a paper towel or piece of wax over the top of the filled ornament. Don’t press too hard, you don’t want the glass ornament to break, but at least apply enough pressure to prevent liquid from sloshing out of the top. Then, swish the cleaner around to coat the entire interior of the ornament. Be sure to get every single part, but try to avoid bubbles if possible. Bubbles will cause the glitter to non-uniformly stick to the sides of the ornament. Dump out the cleaner, wait a few minutes for any bubbles to settle.

123
Then, poor in the glitter, cover the top again and shake until the entire ornament is coated in beautiful glitter! With lighter glitters, you can use less and go for a more frosted look. Or, use a ton of glitter for a bold, beautiful look. It’s entirely up to you! Replace the cap when you get the desired look and hang it on the tree in a place where the cats won’t find it.

14
15
16
DIY Wrapping Paper
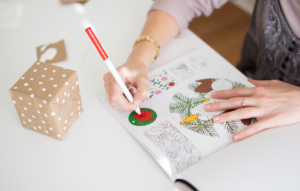
Items needed: paper shopping bag or butcher paper, paint, Q-Tips


Finally, our cheapest and easiest craft yet. This is a great way to add a personal touch to your gifts this year. Basically cut a large shopping bag, or a large piece of butcher paper into an amount that is sufficient to wrap a gift.

z

You can then decide to paint the paper or wrap the gift and then paint the paper. It’s totally up to you, but we like to wrap the gift first to get an idea of how the final wrapping paper design will come together. Pour out a small amount of paint and apply the paint with either a paintbrush or Q-tips. Allow enough time for the paint to dry, but depending on the paint, this can actually be done at the last minute. So even if you’re a little late to the white elephant party, this is still an option as the paint could dry in the car on the way there! Finally, add a cute personalized tag and use any leftovers from the hanging wreath to add tiny adornments to your beautiful present!

z33

z4

z6